
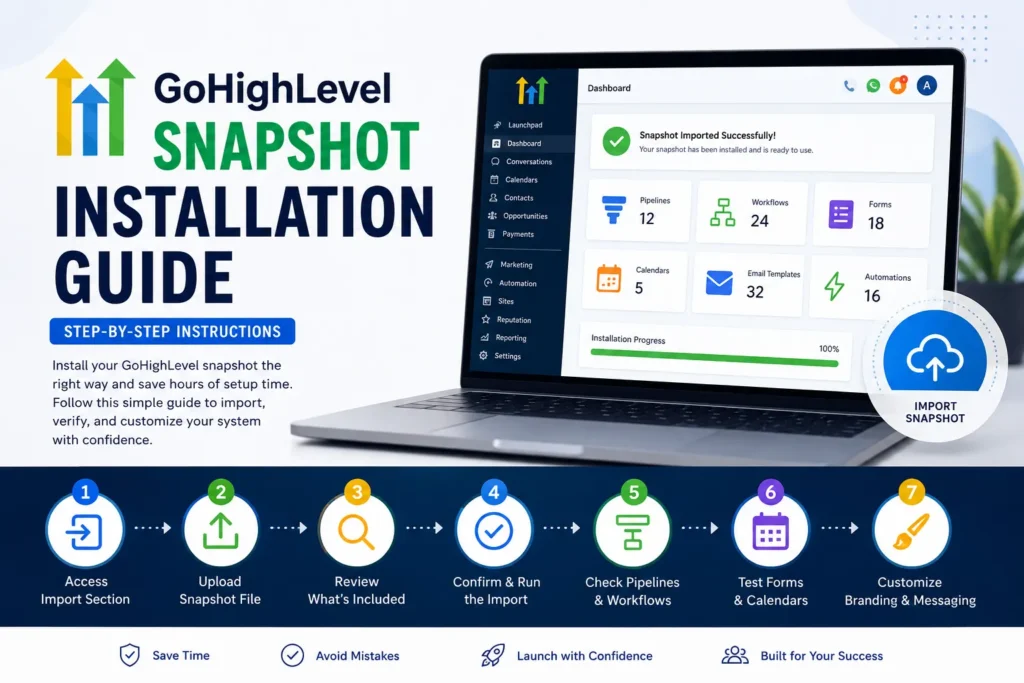
Ever had to import a system into GoHighLevel and not know what to do with it? You are not really alone, and this will cure that issue in no time. This GoHighLevel snapshot installation guide walks you through every step, start to finish. A snapshot represents a collection of workflows, pipelines, forms, and automations in one package. If you install it properly, you’ll save hours of work over building everything manually. Many users miss out on minute steps and then end up with broken workflows later. Proper installation can save you the headache. We go over this process with clients on every project at GoHighLevel USA. This guide takes the task of creating a safety plan in steps so that anyone can do it.
A Complete GoHighLevel Snapshot Installation Guide| What You Need Before You Start
There are some preparations that should be done before you install a snapshot. An active and admin GoHighLevel account is required. Ensure that your account is not in the process of being set up with conflicting workflows already running. It is also a good idea to be familiar with which pipelines and calendars you will be retaining. This should make the whole installation process a lot easier.Step 1: Access the Snapshot Import Section
First, log in as an admin of your GoHighLevel account. Click on “Account Settings” in your dashboard. Search for the “Import Snapshot” or a similar section. The whole installation process starts here. Be sure you are on the right sub-account before proceeding.Step 2: Upload the Snapshot File
After logging in to the import area, you must upload your snapshot. Choose the appropriate file that your snapshot builder or agency has provided. Make sure that the file name is the correct one you are expecting to install. When a wrong file is uploaded, it can overwrite settings you wanted to retain. Here’s a chance to prevent a trivial error that is easily corrected.Step 3: Review What’s Included Before Importing
The majority of snapshots display a preview of what will be added. Check the pipelines, workflows, forms, and templates listed. This is important because this is an assurance that there is no unexpected importation. When it doesn’t look right, stop and ask the person who created the snapshot. This quick check here ensures no confusion upon installation.Step 4: Confirm and Run the Import
Then check it out; if it seems right, confirm the import and the process will start. This will take a couple of minutes depending on the size of the snapshot. Avoid closing the browser tab while the import is running. Once the installation is successful, GoHighLevel will let you know. This is the base step in any worth-reading GoHighLevel snapshot installation guide.Step 5: Check Your Pipelines and Workflows
Once you have imported your pipelines, open the pipelines to verify each stage on the pipeline has been imported properly. Ensure workflow triggers are enabled and have not been inadvertently disabled. This step will help identify most problems early before they impact real leads. If it seems that something is missing, re-read the original snapshot file for errors. Testing early saves time compared to fixing problems later.Step 6: Test Your Forms and Calendars
Make a test entry via your lead capture forms. Verify that your data correctly flows into your pipeline as you expect. Schedule a test appointment in your calendar to verify reminders/buffers. Small tests to verify the entire system is functioning as intended. This is one of the most frequent user errors.Step 7: Customize Branding and Messaging
After everything is checked to be operational, customize the system for your business. If necessary, change your logo, brand colors, and contact information. Customize email and SMS templates to reflect your tone and voice. This step will allow you to create a generic import and make it feel like your own system. Consistency with your brand also helps to create trust with your leads and clients.Choosing the Right Time to Install Your Snapshot
The most important part of a gohighlevel snapshot installation guide is the timing! Don’t install during the rush hour of business. The time of day is important, do a quiet time, such as early morning or after hours. This allows you to experiment with everything without the live leads being impacted. Proper timing helps to minimise stress throughout the process.New to GoHighLevel? Try it free for 30 days
HighLevel's standard free trial is 14 days. Through our partner link you get 30 days plus HighLevel's free onboarding bootcamp. Rather have it built for you? Our US team sets up GoHighLevel accounts, websites, funnels and automations.
Start 30-day free trialBook a free strategy call
Partner link: we may earn a commission at no extra cost to you. Disclosure
Backing Up Your Existing Account First
Before you install gohighlevel snapshot files, always back up your current setup. Share your existing workflows, or record the important stages of your pipeline in advance. This will help protect you in case something needs to be restored at a later time. A quick backup can save hours of rework and takes minutes. Most agencies don’t want to take that risk and skip this step.Understanding Snapshot Compatibility With Existing Workflows
Not all snapshots are compatible with all the workflows already operating in your account. By following the proper steps to import gohighlevel snapshot, you can identify conflicts early. Look for duplicate tags, overlapping triggers, or repeated pipeline names. Solving these ahead of launching maintains your automations neat and dependable. Small but significant compatibility checks.Training Your Team After Installation
Having a successful installation is not enough and requires a team familiar with its operation. Review the new pipelines, forms, and calendars with your staff. Short training sessions will not confuse when real leads begin to flow. Key information needs to be readily available to all and kept up to date. This step helps to make a technical install a system that your entire team can trust.Monitoring Performance in the First 30 Days
The first few days following installation are just as important as the installation process itself. Monitor new leads in your new pipelines. Watch for any workflow that isn’t triggering as expected. Small problems are identified early, and therefore do not escalate into larger problems. This is a habit that can make the difference between a successful launch and a disaster.When to Consider a Professional Installation Instead
Not all businesses can take the time to install properly. If you’re in a hurry, you’re likely to miss steps and make some mistakes along the way. The professionals can handle all aspects of the work when they are put in place. We’d like to take this opportunity to share with you that we take each step in this GoHighLevel snapshot installation guide personally for every client. This eliminates the guessing game and risk on your end.Common Installation Mistakes to Avoid
A few simple mistakes can lead to unnecessary problems after installation. If you use any of the gohighlevel snapshot installation guide, look out for these:- Skipping the pre-import review, which results in no guarantee of what might be overwritten in the process
- Not testing workflows, broken automations go unnoticed for days at a time
- Double booking or wrong time zone (ignoring calendar settings)
- Ignoring existing data conflicts (redundant contact and/or tag creation)
- Not updating branding, having generic messaging live